New product: Access / Link
With Tentary, you can easily sell a link or access to products or services. In this article, we’ll show you how it’s done.
If your product, for example, resides on another server or consists of a link to a Zoom call, a Facebook group, or something similar, this product type is the right choice.
Create a Product
To create a new product, navigate to the Products page. Then click on + New Product. A pop-up will appear where you can select the product type Link / Access. This product type is fixed and cannot be changed later.
Sales Page
At the top of the page, you can give your product a title, write a description, upload product images, or add a YouTube video.
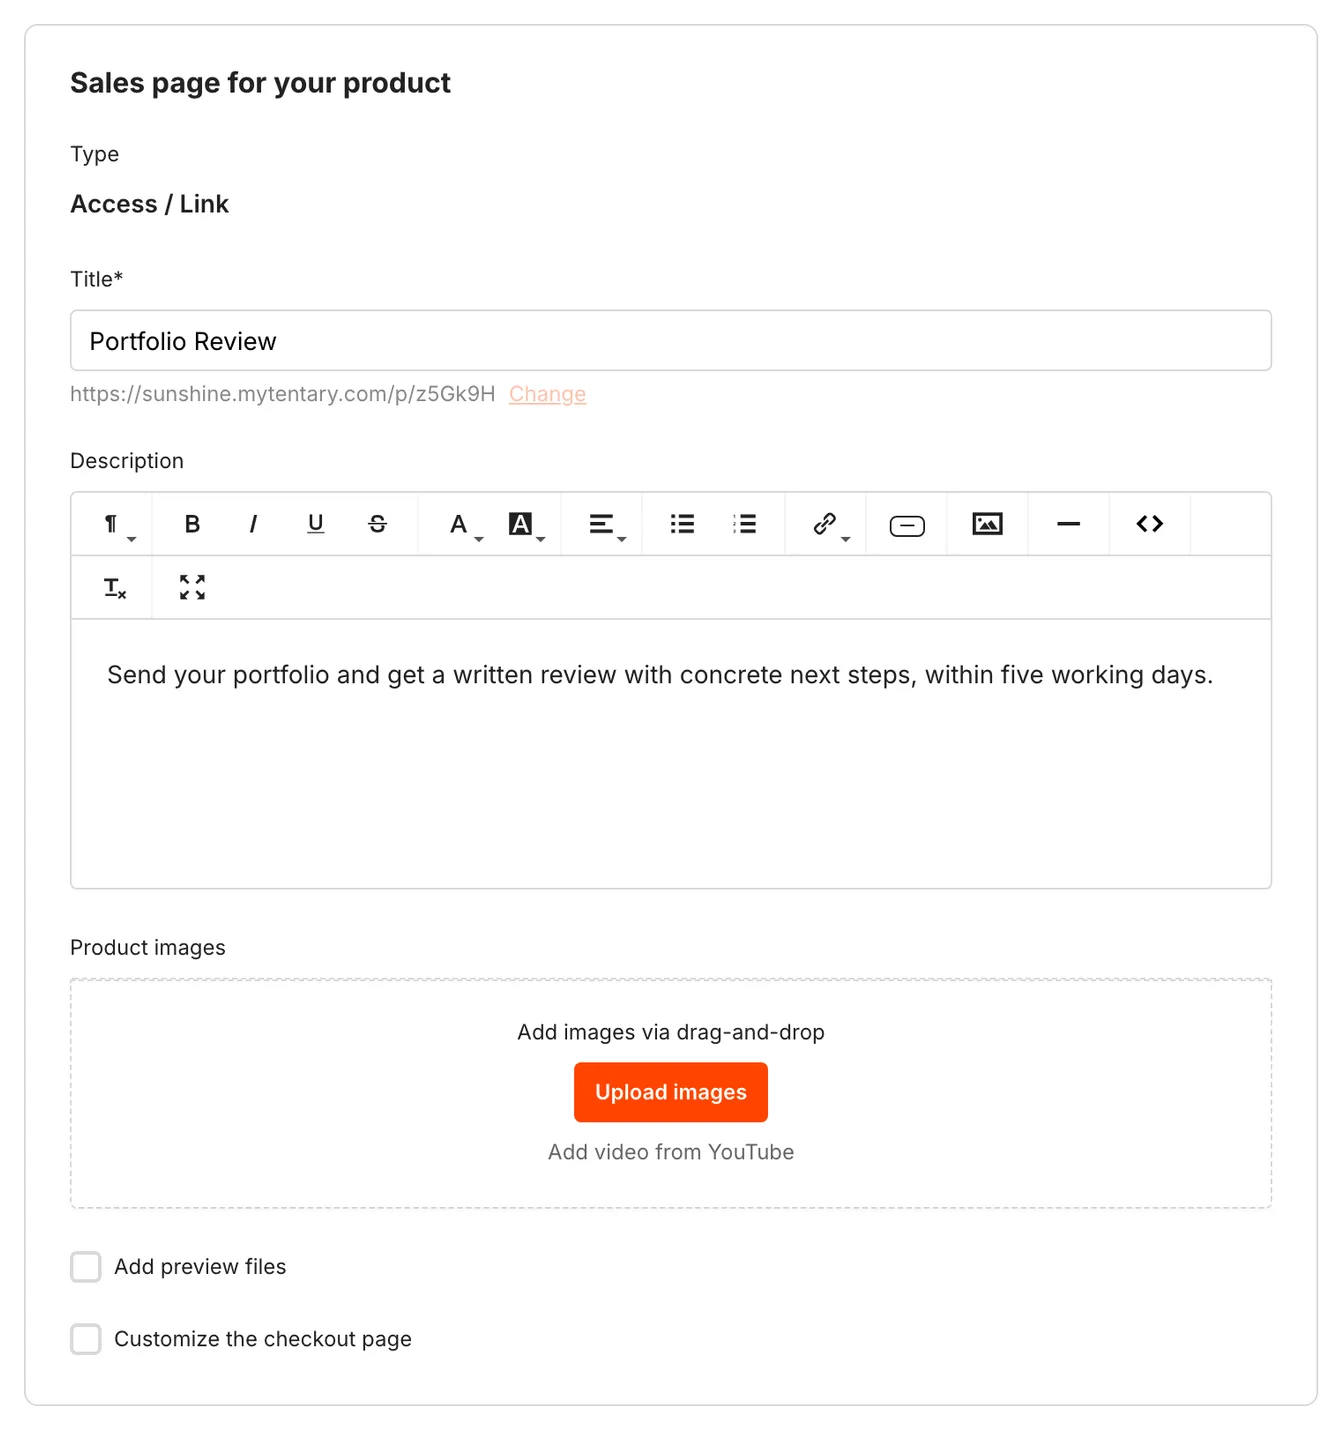
Title
Choose a suitable name for your link or access product that clearly conveys to your customers what the product or service is about. A precise and appealing description increases the likelihood of your product being purchased.
Description
In the product description, you can format your text for a customized look. The following options are available:
- Various paragraph formats (paragraph, quote, headings 1–4)
- Text styling (bold, italic, underline, strikethrough)
- Text and background color palettes
- Alignment options (left, center, right, justified)
Additionally, the following features are available:
- Adding links to other websites
- Inserting a button with its own button text and target URL
- Embedding images
Note: The description for uploaded images serves as the alt text. If no description is provided, the file name will be used as the alt text
- Using a horizontal line to separate content
- Viewing and editing the HTML code
- Removing applied formatting
- Fullscreen mode/normal view
Product Images
First impressions are often visual, even for products sold online. Take some time to create attractive and relevant images for your product. Products with images generally sell much better than those without.
To upload images, you can either drag and drop them into the Product Images box or click the Upload Images button.
Note: The supported image formats are JPG, PNG, WEBP, GIF.
In the latter case, the menu of your computer or smartphone will open to select images for upload. Select one or more images and confirm the upload. You can put the uploaded images in your desired order by holding and dragging them.
Recommendation: If you’re looking for free images to use and edit for your product, we recommend Unsplash and Pixabay.
You can also add a YouTube video. Click the corresponding option, paste the YouTube link, and confirm by clicking Add.
Preview Files
Under Preview files you can upload up to 10 audio or PDF files as free samples. Your customers can listen to them or view them directly on the sales page, so before they buy.
Click Upload preview files and pick the files you want.
Tip: A short excerpt is enough. It gives your customers a feel for the quality without giving away your whole product.
Customize the Checkout Page
Just below you will find the Customize the checkout page section. It lets you shape the checkout page for this product alone:
- Checkout description (optional): an extra text shown on the checkout page.
- Checkout banner image (optional): an image shown at the very top of the checkout page. Click Upload image to pick one.
Both fields are optional. Leave them empty and the checkout page stays the way it looks by default.
Price
In this section, you can set the price for your product and choose which payment options to offer your customers.
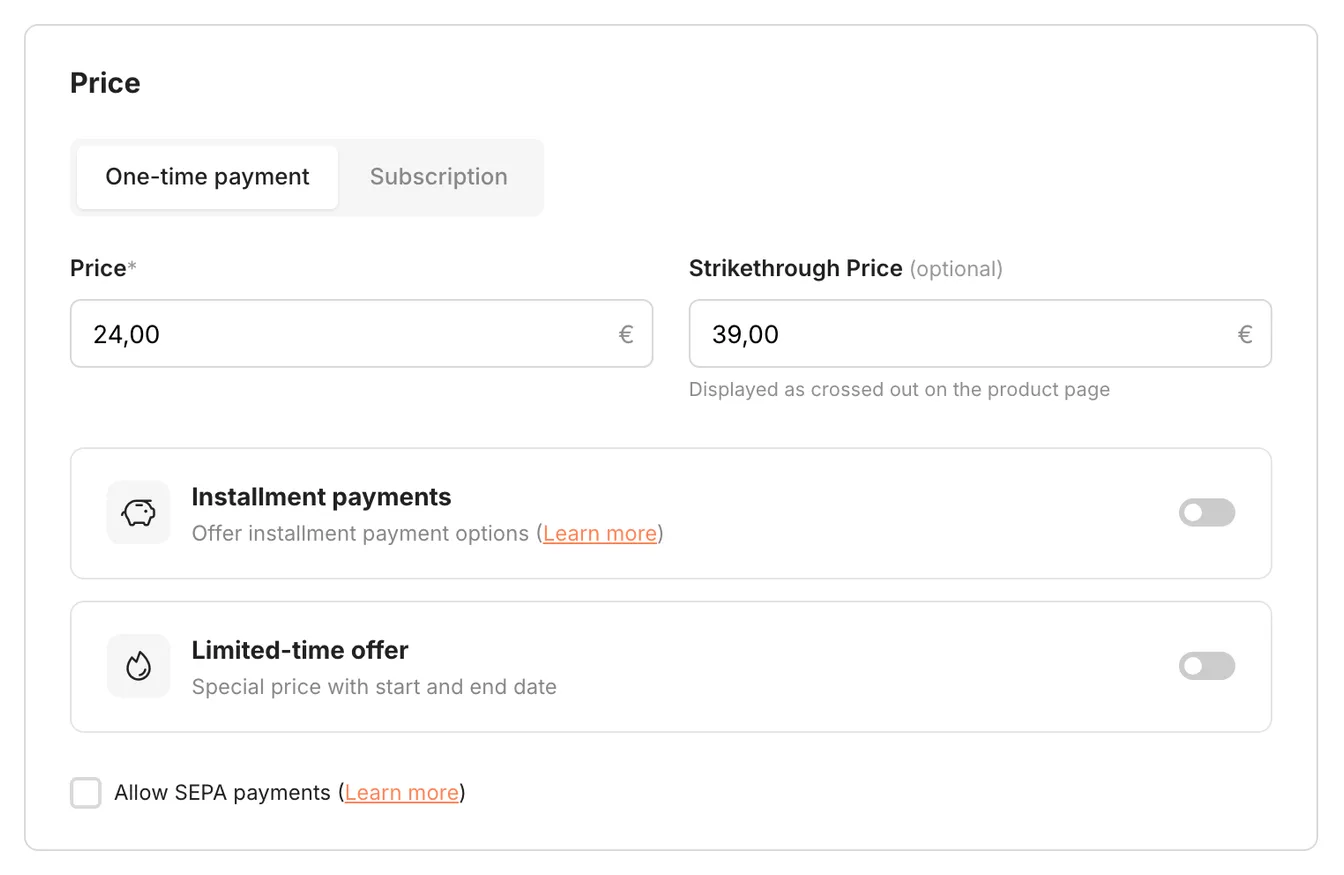
One-Time Payment & Subscription
Choose whether your product requires a one-time payment or a recurring subscription payment.
Price & Discount Price
You can offer your products for free or at a minimum price of €1.
Enter your desired price, which can include up to two decimal places (e.g., €9.99). Price formatting will be verified and corrected if necessary upon saving.
Keep in mind that price is a crucial factor in the success of your product. Sellers often price their products too low initially. Experimenting with pricing is recommended when starting out.
Use the Discount Price field to indicate a reduced price.
Note: The discount price must be lower than the current price for it to be displayed.
Limited-Time Offer
With Limited-time offer you sell your product at a special price for a set period. You enter an Offer price plus a start and end date. After that your regular price applies again automatically. If you want, you can also show a countdown on the sales page.
For how to set this up, read the article Create Limited-Time Offers & Activate Countdown.
Installments
If you’d like to offer installment payments, specify the number of installments and their amounts. More information can be found in the article Everything about installment payment.
SEPA Payments
Enable SEPA payments for this product if desired, and allow instant product delivery after purchase.
Learn more in the article Everything About SEPA Direct Debit.
Note: In this case, customers will receive the product immediately, even if the SEPA payment has not yet been processed by your payment provider.
Product Variants
Customize your product by offering different contents or versions of the same product for selection at purchase.
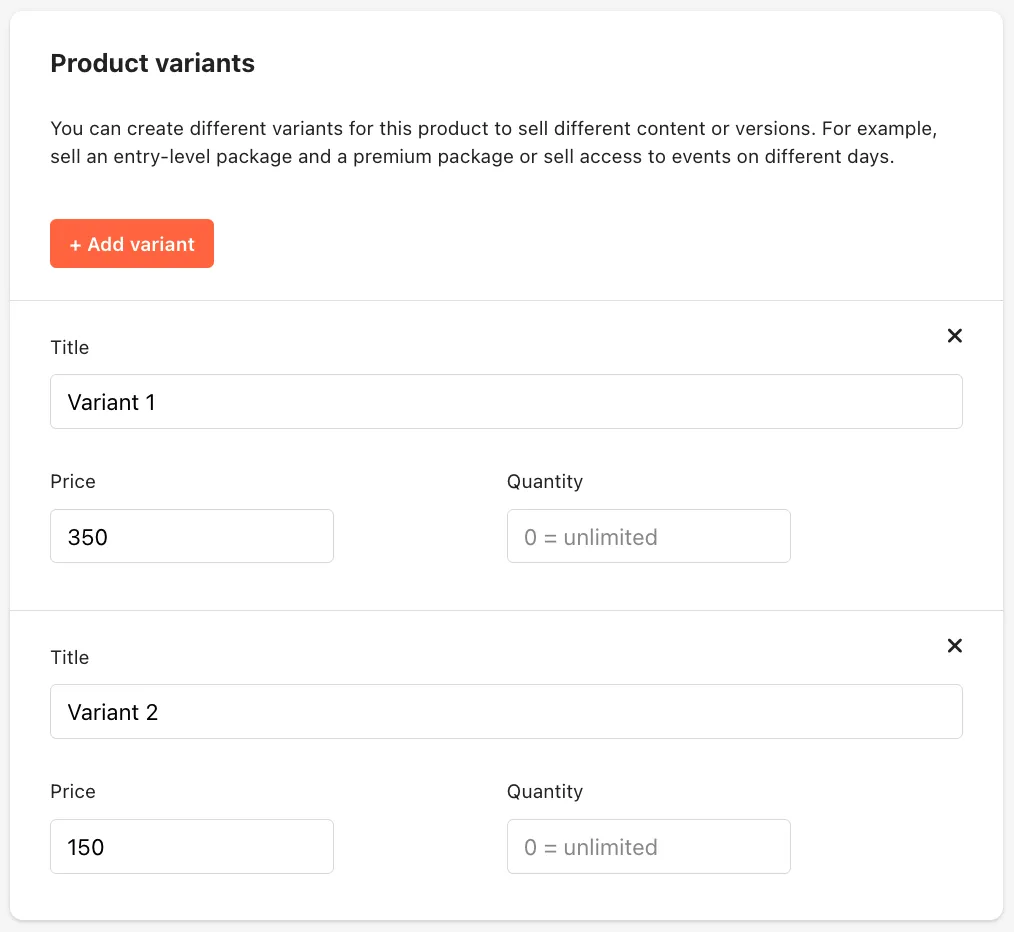
Click + Add Variant, assign a specific title, set a price, and optionally define a quantity. To add multiple variants, click + Add Variant again and complete the respective fields.
Note: Products with variants can only be sold at a one-time price. Other pricing options (installments, SEPA direct debit, subscriptions) are not available for variant products.
Post-Purchase
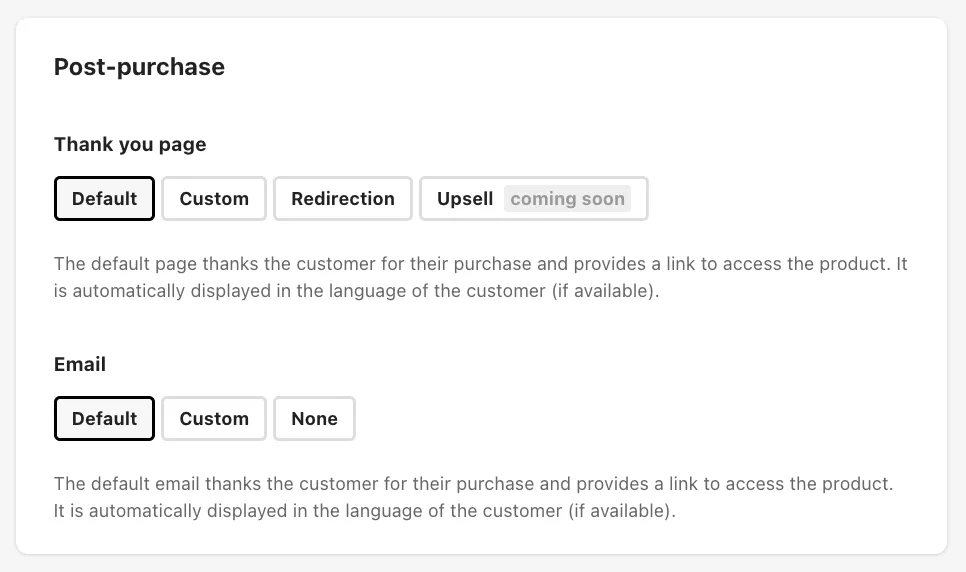
Here you can set which thank you page and email will be shown or sent to your customers after a purchase.
Thank You Page
For the thank you page, you can choose between Standard, Custom, or Redirection, and soon also for Upsell.
The standard thank you page gives a general thank you to your customers and shows slightly individualized info depending on the product type including a button with the access link. You can fully design the custom thank you page to your liking.
In addition to the usual formatting options, various drag-and-drop buttons are available as placeholders which you can position on your thank you page. Your customers will see the respective information at this spot.
Note: The drag-and-drop buttons personalize your thank you page and provide info about the buyer (email, full name, first name), the order (e.g. product title, access link), and the seller (name, support email).
If you activate the redirection, you can store a link that will take your customers directly to an external thank you page.
Info: You can display the thank you page by clicking on Preview: Thank you page on the product page.
In the email section, you can choose which email will be sent to your customers after the purchase. You can select between Standard, Custom, and None.
The standard email includes a thank you to your customers and a button so they can directly access the product.
Like the thank you page, the custom email can be individually tailored to your shop and target audience. In addition to bold and italic text formatting, you can insert links and format your text as paragraphs or headings. As with the thank you page, various drag-and-drop elements can be integrated into your text for personalization.
If you don’t want to send an email – because you’re doing it, for example, via a third-party email service – the option None is the right choice for you.
Info: You can preview the order confirmation email via Preview: Order confirmation (email).
Further information on the thank you page and e-mail order confirmation.
Your Product
If you offer different variants, first select the variant to be edited in this section.
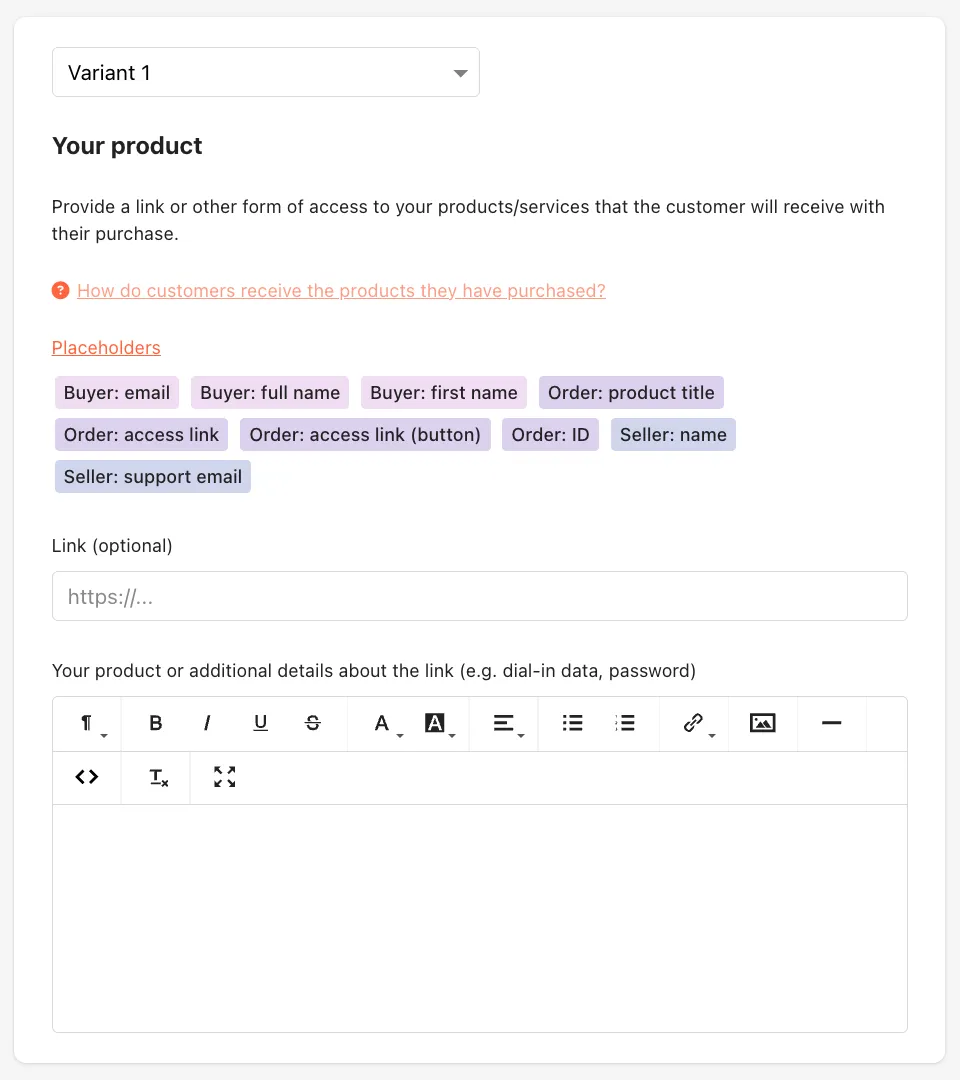
Then you can assign a link (optional) to your product, which will be prominently displayed to customers after purchase. You can also include additional details about the link in the text field below.
To customize your text, click on Placeholders for text blocks to find all the drag-and-drop elements that you can move directly to the right place.
Note: In the article How Do Customers Receive Purchased Products and Services?, you can see what the product page looks like to your customers.
Settings
Activate the desired features in this section, as described below.
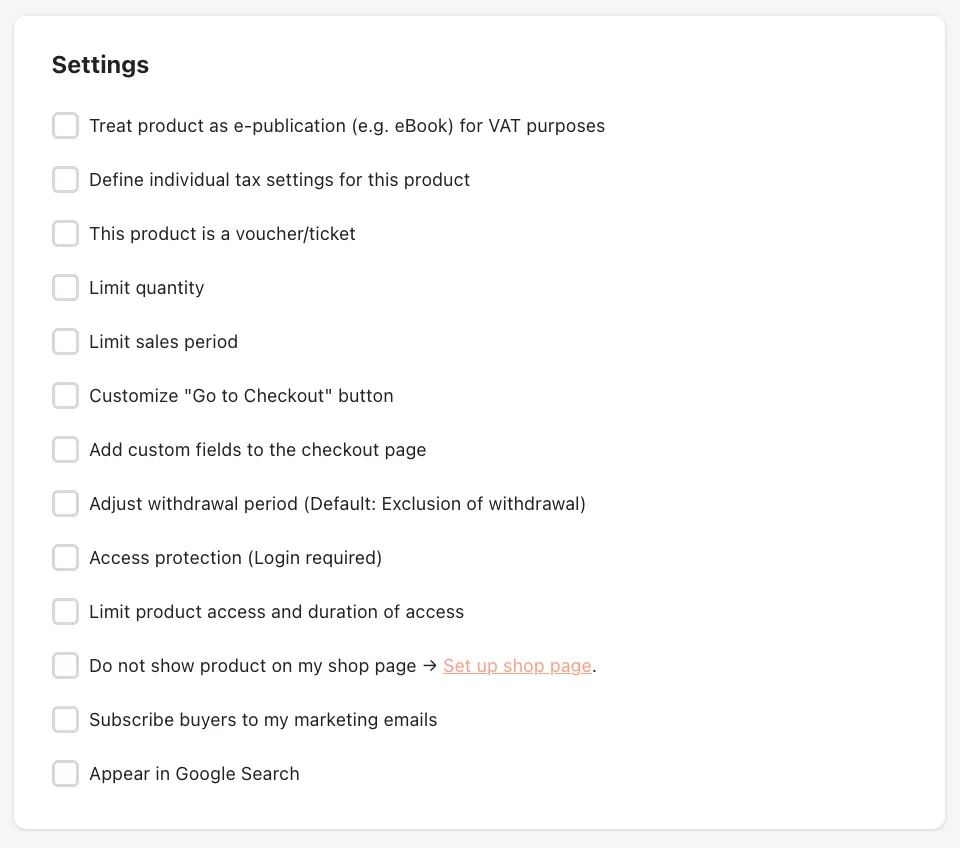
Treat Product as Electronic Publication (e.g., eBook) for VAT Purposes
When enabled, this option applies a reduced VAT rate for book-like products.
Define individual tax settings for this product
Depending on the product type and/or your company’s industry, you may need individual tax settings for a product. If you activate this option, you can then enter an individual tax rate and an additional note as to why the tax rate differs. This will be shown on the invoice.
This Product is a Voucher / Ticket
If selected, you can later track which products or vouchers have been redeemed. Learn more in the article Vouchers/Tickets.
Limit Quantity
Restrict the number of times your product can be sold. For example, you might limit the number of participants in a workshop or offer a specific quantity at a discounted price. For the latter, you can also use coupon codes.
Limit Sales Period
Offer your product for a limited time by setting a start and/or end date. Links to your product page can be shared before the start time, but the purchase button will only be visible within the defined period.
Note: Regardless of timing, you must publish your product for it to be visible to customers.
Customize “Go to Checkout” button
If you want to rename the Go to Checkout button, you can enter a new title here.
Customize “Order for free” button on the checkout page
If you offer your product free of charge, you can use this option to customize the text of this button on the checkout page. This is not possible for chargeable products due to legal requirements.
Add custom fields to the checkout page
You can use one or more custom fields to request individual data from your customers on the checkout page or to display a note. These are displayed in the additional information section, below the delivery information and above the payment method.
You can create different field types (short text, long text, selection list, checkbox and checkboxes, note). You can find more information on this in the article Checkout Page: Using Custom Fields.
Adjust Withdrawal Period (Default: Exclusion of withdrawal)
By default, Tentary excludes refunds for digital products during the purchase process. Customers must agree to this before payment.
Note: Refunds are typically allowed for physical products. For digital goods, refunds can be excluded as the product is fully accessible and replicable after purchase.
To modify the default setting, enable this option and choose a refund period of 14 or 30 days.
Access protection (Login required)
To protect your product from unauthorized access, you can specify that your customers must log in to be able to view your product. You can find out exactly how this works here.
Limit Product Access and Duration of Access
Specify when customers can access your product and set a time limit for how long access will be available.
Do not Show Products on my Shop Page
If you don’t want this product displayed in your shop (e.g., for targeted customers only), use this option.
Subscribe Buyers to my Marketing Emails
When enabled, customers are automatically subscribed to your marketing emails after purchase. A checkbox will appear during checkout, allowing them to opt-in. Learn more in the article Email Marketing with Tentary.
Appear in Google Search
Activate this option to make your product discoverable on Google. Without activation, your product page will include the noindex meta tag. With activation, it will use the index, follow tag and be included in our sitemap for indexing.
Save
Click Save to save your content or changes.
Note: Your product will not automatically be published. To make it live, set the product status to Live and save it again. Learn more in the article Creating, Saving, and Publishing a New Product.
Last updated March 19, 2026